How to Use pcDuino to Host Your Own Local Ubuntu Repository
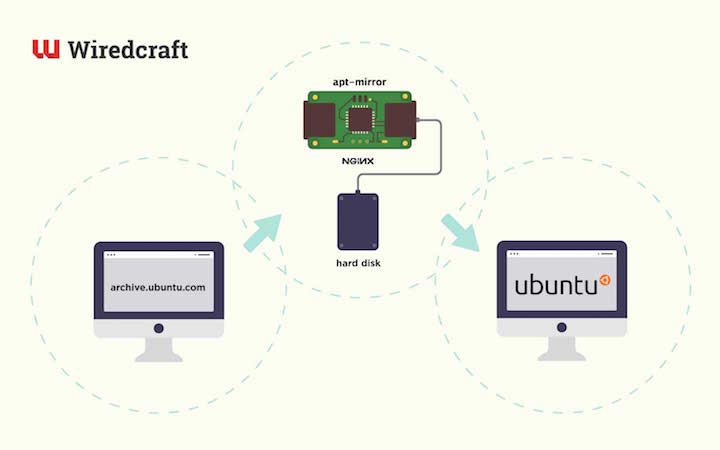
In our office, we often need high speed networks to download Ubuntu packages frequently and repeatedly for our work with our of programming and deploying our projects to production servers. Considering limited resources provided to host Ubuntu packages in China and the bandwidth of the network connection to office is also limited. So, hosting my own mirror in the local network of our office was a good choice to explore. I use my pcDuino to host my own local Ubuntu repository for speeding up my work for any project that I work on, including Wiredcraft’s work for a major Food & Beverage in China. I open sourced the deployments steps that explained in this article for your future reference, you can check them out on my peronal GitHub and Wiredcraft’s GitHub.
Why pcDuino?
Sparing a computer for this job is not energy efficient because the computation power needed is really low. It is a waste having a computer up and running as 24*7 for this purpose. I considered raspberry pi, but there is no way having an external hard drive connected to it. After searching for a while, pcDuino caught my attention.
The version I bought is pcDuino3 Nano. The CPU is AllWinner A20 SoC, 1GHz ARM Cortex A7 Dual Core, it has 1GB memory. The surprising thing is that it equipped with a 1G network port and a SATA port. This means I can use my spare hard drive with 1T capacity to connect to this board. It has potential 100MByte/s network speed for the purpose of distributing ubuntu packages as I want.
Let’s review the benefits of using this board.
- It is power efficient, the board itself needs only 10W power supply, at most.
- It provides 1G network port, it has the potential to speed up my work effectively by lowering the waiting on network.
- It is capable of connecting to an external hard drive.
- CPU / Memory is enough providing file hosting service.
- It is small and portable; I can bring it to office or home, if I want.
- It has two power ports. I can use one to connect my battery and the other to USB adapter. (High Availability!)
- Affordable (This board costs me less than 300 yuan about 50 USD)
- It’s a piece of hardware I can have fun with.
My Stack
The automatic deployment tool I use is Ansible, which is simple to start with. It is helpful to keep deployment steps maintainable in declarative way using YML and having source code version controlled by Git. The board shipped with Ubuntu 12.04, you can build your own image using tools provided by pcDuino. To simplify the steps, I am going to use Ubuntu 12.04 as the server platform. It does not make much difference if you prefer Ubuntu 14.04 or newer releases. Apt-mirror is used to synchronize all the packages from a Ubuntu mirror to your local.
Make it work!
-
Setup the case for the pcDuino board, bind the external hard drive to the case using packaging tapes and connect the necessary cables. I recommend connecting the board to your desktop/laptop computer installed with Ubuntu using a power cable for the first time you start up the board (you need a spare one, because the board is not shipped with a power cable, but a cable for connecting Android devices to a computer will suffice).
-
Start the board. If the board is connected to a computer, then it will build a network between your computer and the board. Start a shell in your computer and SSH to [email protected]. It will connect to the board. The password is also ubuntu.
-
Install apt-mirror using this command:
sudo apt-get install apt-mirror. Configure /etc/apt/sources.list to lie this:
############# config ##################
#
set base_path /data/storage
#
# set mirror_path $base_path/mirror
# set skel_path $base_path/skel
# set var_path $base_path/var
# set cleanscript $var_path/clean.sh
# set defaultarch <running host architecture>
# set postmirror_script $var_path/postmirror.sh
# set run_postmirror 0
set nthreads 20
set _tilde 0
#
############# end config ##############

deb-amd64 http://cn.archive.ubuntu.com/ubuntu trusty main restricted universe multiverse
deb-amd64 http://cn.archive.ubuntu.com/ubuntu trusty-security main restricted universe multiverse
deb-amd64 http://cn.archive.ubuntu.com/ubuntu trusty-updates main restricted universe multiverse
deb-amd64 http://cn.archive.ubuntu.com/ubuntu trusty-backports main restricted universe multiverse
deb-amd64 http://cn.archive.ubuntu.com/ubuntu trusty-proposed main restricted universe multiverse

deb-i386 http://cn.archive.ubuntu.com/ubuntu trusty main restricted universe multiverse
deb-i386 http://cn.archive.ubuntu.com/ubuntu trusty-security main restricted universe multiverse
deb-i386 http://cn.archive.ubuntu.com/ubuntu trusty-updates main restricted universe multiverse
deb-i386 http://cn.archive.ubuntu.com/ubuntu trusty-backports main restricted universe multiverse
deb-i386 http://cn.archive.ubuntu.com/ubuntu trusty-proposed main restricted universe multiverse

deb-src http://cn.archive.ubuntu.com/ubuntu trusty main restricted universe multiverse
deb-src http://cn.archive.ubuntu.com/ubuntu trusty-security main restricted universe multiverse
deb-src http://cn.archive.ubuntu.com/ubuntu trusty-updates main restricted universe multiverse
deb-src http://cn.archive.ubuntu.com/ubuntu trusty-backports main restricted universe multiverse
deb-src http://cn.archive.ubuntu.com/ubuntu trusty-proposed main restricted universe multiverse
These lines defined that we are going to synchronize amd64 and i386 packages and the source code for those packages. It is very similar to config file /etc/apt/sources.list, the URLs in those lines are the repository you want to synchronize from. Base_path is the location you want apt-mirror to keep those packages.
- Edit /etc/fstab, adding an extra line describing external hard drive information, this will mount external hard drive to correct location when booting operating system. You can find detailed steps in the following page: http://askubuntu.com/questions/154180/how-to-mount-a-new-drive-on-startup
- Assuming you have mounted the hard drive, created base_path folder, test apt-mirror by running “sudo apt-mirror”, this command will start synchronizing right away, you can find folders created by apt-mirror. In my case, files written to /data/storage are stored in the storage folder of the hard drive.
- If everything works fine, mirroring all packages will take 190G of your hard drive. After finishing an initial synchronization, your future syncs will be much faster. Then you want it to automatically synchronize on a regular basis. Edit /etc/cron.d/apt-mirror, uncomment and edit cron settings accordingly.
- At this point, we need to figure out a way to host those packages and allow others to download. Thanks to apt-mirror, everything is prepared, except that we need to install a web server like Nginx.
- Install Nginx using this command,
sudo apt-get install nginx. We have an ansible role installing Nginx automatically, check that: https://github.com/wiredcraft-ops/role-wcl-nginx
My deployment steps written in ansible is here. It contains each step I mentioned earlier.
Performance
My service has been up and running for about two weeks. The average download speed for a single large file using Nginx is about 30MB/s, which I was pleased with and found really cool for a device like this. The average speed for a real upgrade for a Ubuntu client is between 2 - 30MB/s. When the download reached and kept the speed at 30MB/s, the CPU of pcDuino is the bottleneck, the Nginx need more than the CPU computational power can provide. We know that Nginx is efficient, there is not much space for optimization. The relative low speed for the real upgrade is probably because it Ubuntu was downloading many packages with small sizes.
Effectiveness and Efficiency
In a workspace like Wiredcraft, we need to do things effectively and efficiently, that includes a way to download Ubuntu packages with higher speed to minimize the waiting on network. Using a device like pcDuino is a good choice for this purpose. We use Ansible to deploy and maintain this device allowing other Ubuntu clients in our office downloading packages from it. We use apt-mirror to synchronize (mirror) all packages from an official source. In terms of the outcome of this experiment, using this device can effectively speed up the process especially for packages with bigger sizes. But pcDuino’s CPU has a limit, surprisingly, it can be the bottleneck of this small service, and that is reason why the speed can not reach to 100MB/s which is the rough limit of Gigabit port. Overall the results are still satisfying.
Stay tuned
Follow our newsletter or our WeChat account; every other week you'll receive news about what we're up to, our events and our insights on digital products, omnichannel, cross-border ecommerce or whatever the team fancies.
-
Add us on WeChat

-
Subscribe to our newsletter