13 Steps to a Faster Jekyll Website
Making your Jekyll or GitHub pages website faster in 13 easy steps.
I started using Jekyll (or rather GitHub pages) about 6 years ago after years of disappointment with the CMS space (I’m looking at you, Drupal). Getting back to building actual HTML pages and not fighting some “framework” was refreshing, but what made me and my team fall in love with it was its speed.
Over the past 6 years, we went on to build a ton with it: simple landing pages, developer documentations, Open Source communities, blogs like this very website, and Web apps (for example the subnational data browser for the World Bank).
And along the way, we figured out a thing or two when it comes to performance. I shared these discoveries at JekyllConf 2016 and I thought I’d offer some more details about what it is that we do to build fast Jekyll websites.
Fast, you say?
Let me first clarify what I mean by fast. There are mainly two things we’ll be attempting to reach:
-
Fast generation: this mostly impacts your life as a developer (and potentially an editor). As the number of pages on your site grows, Jekyll can become painfully slow to build. If you’re on Jekyll 3 (now supported on GitHub pages), you can get some insights on this part using the Liquid profiler with the
--profileflag. -
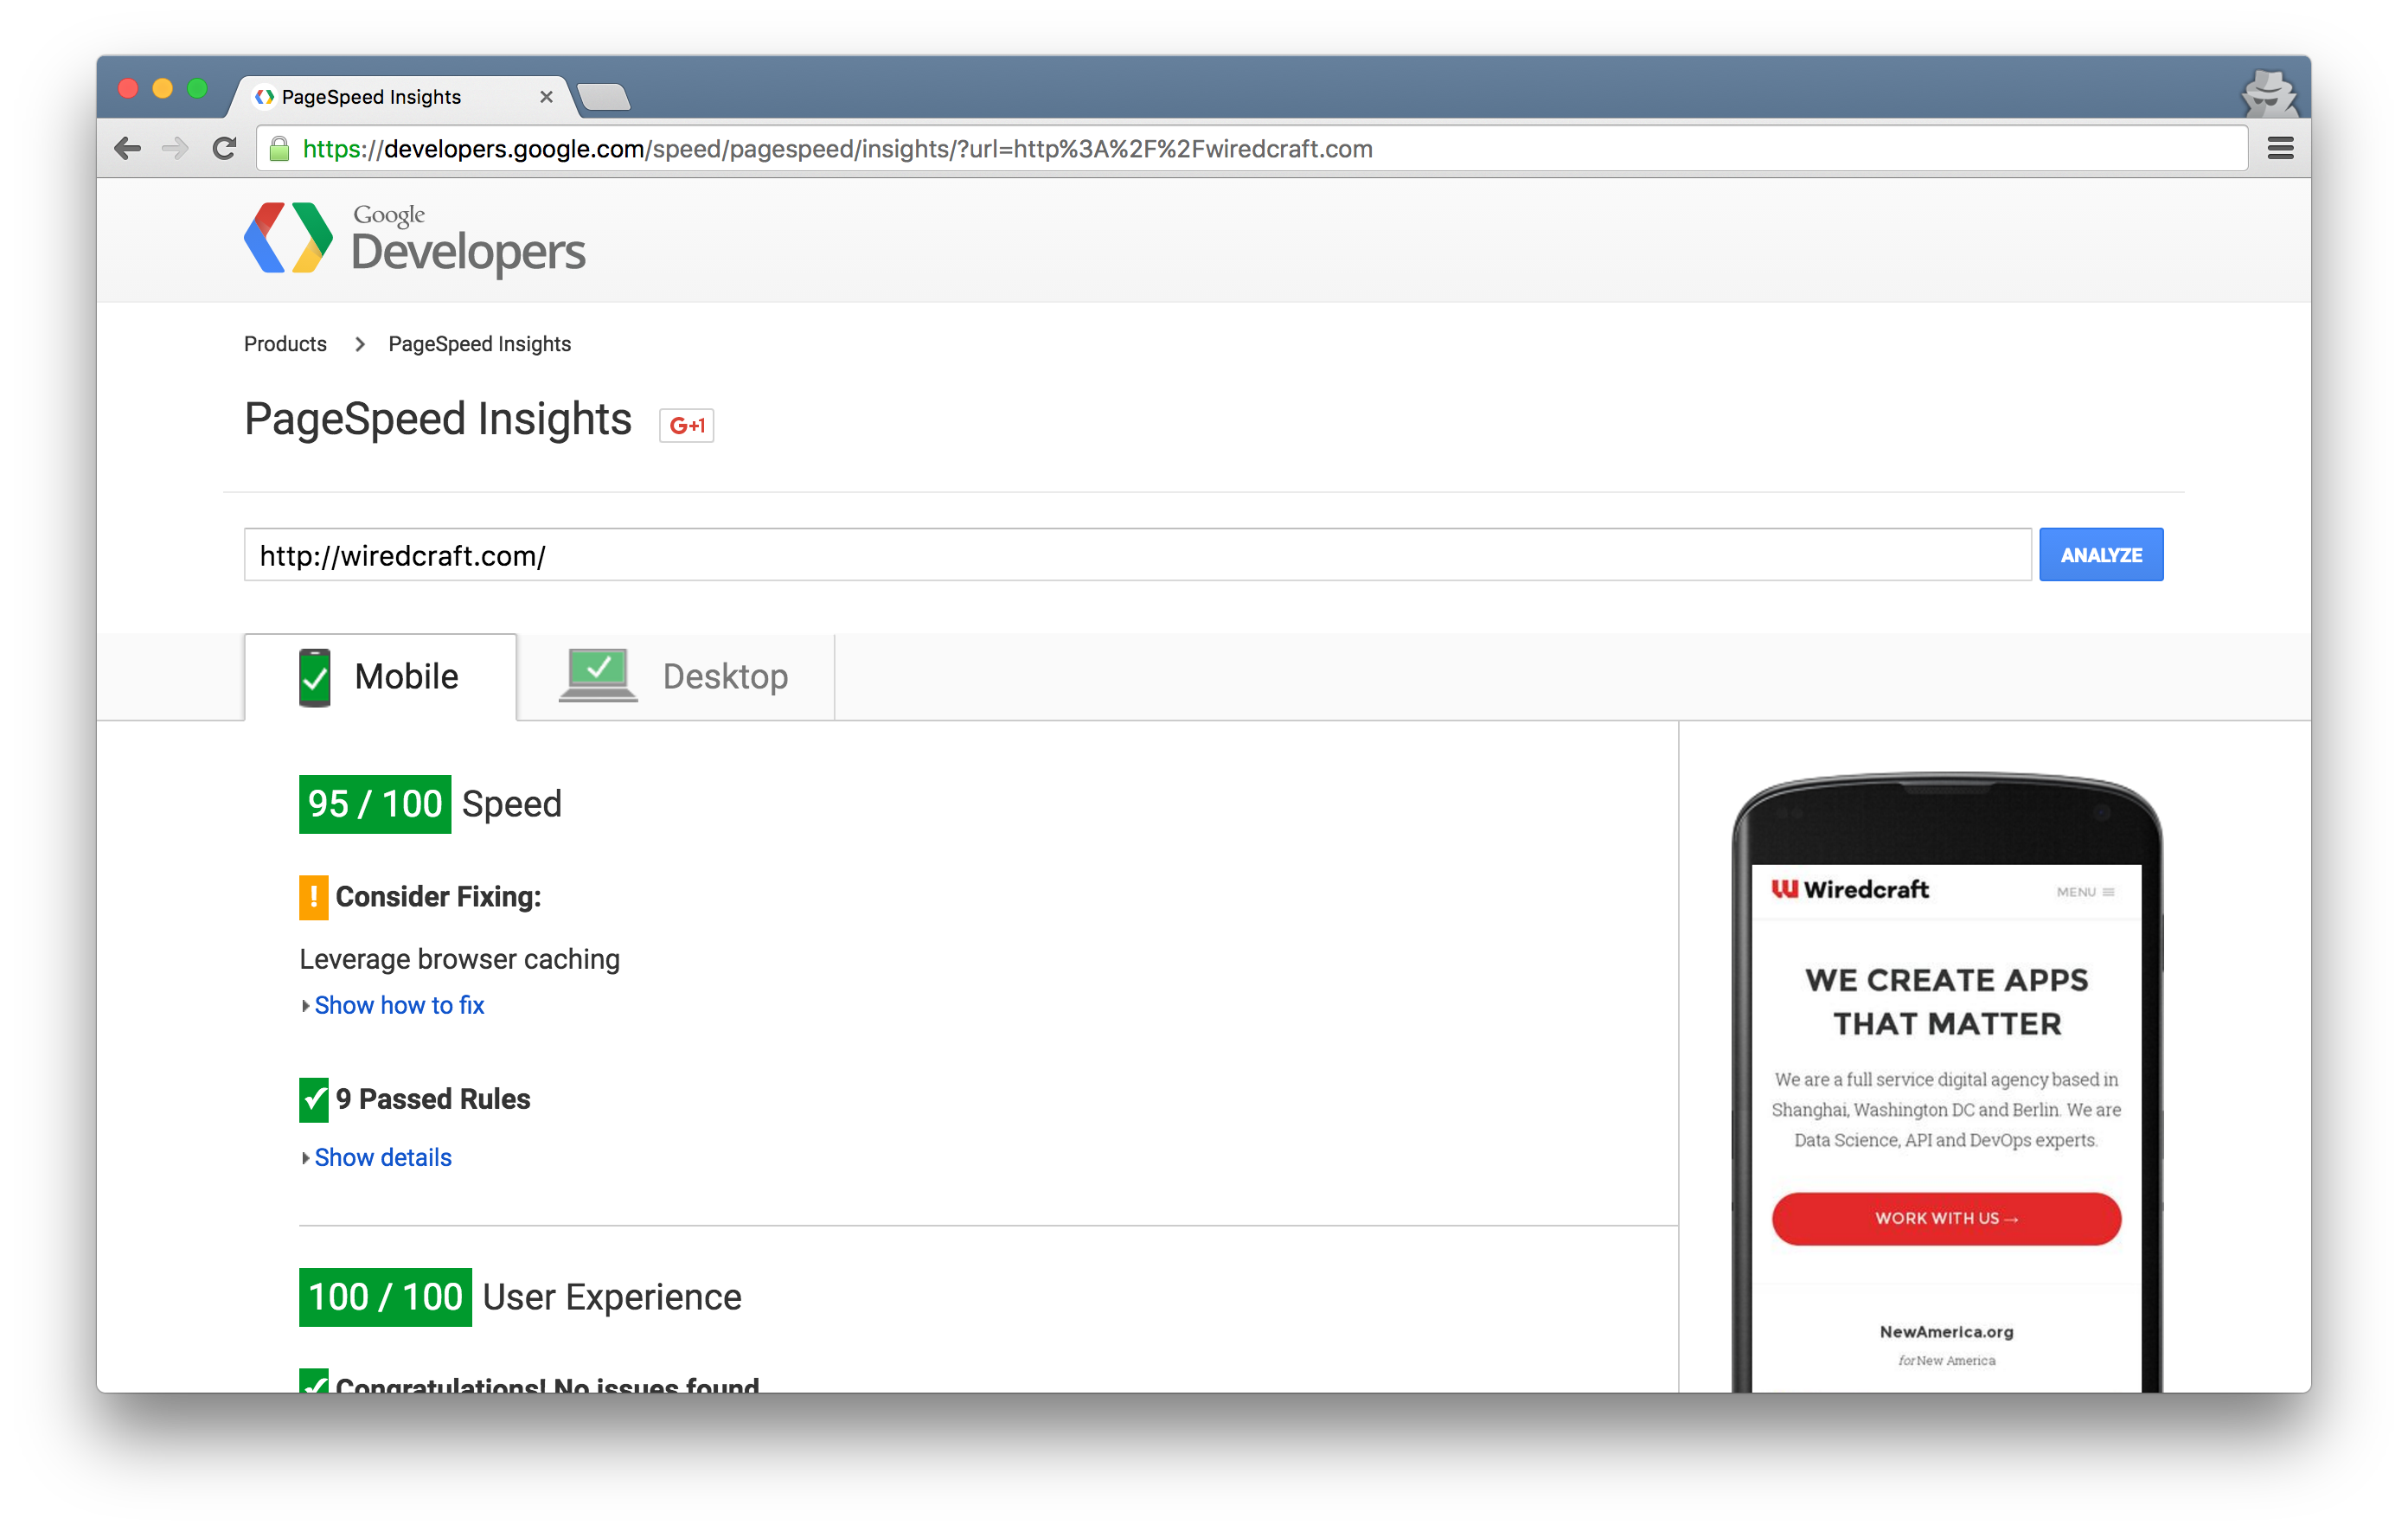
Fast loading: you want your website to load as fast as possible. This is where static generators can really shine. Keep in mind that the loading speed of your website also affects your SEO; getting a high score on Google’s PageSpeed Insights should be a priority.
Last thing to mention before we delve into the steps necessary to reach these two goals: I’ll be assuming in some cases that you use GitHub pages. It is still, as of today, the most convenient hosting solution for Jekyll websites.
Let’s get started, shall we?
Step 1: Optimize your pictures
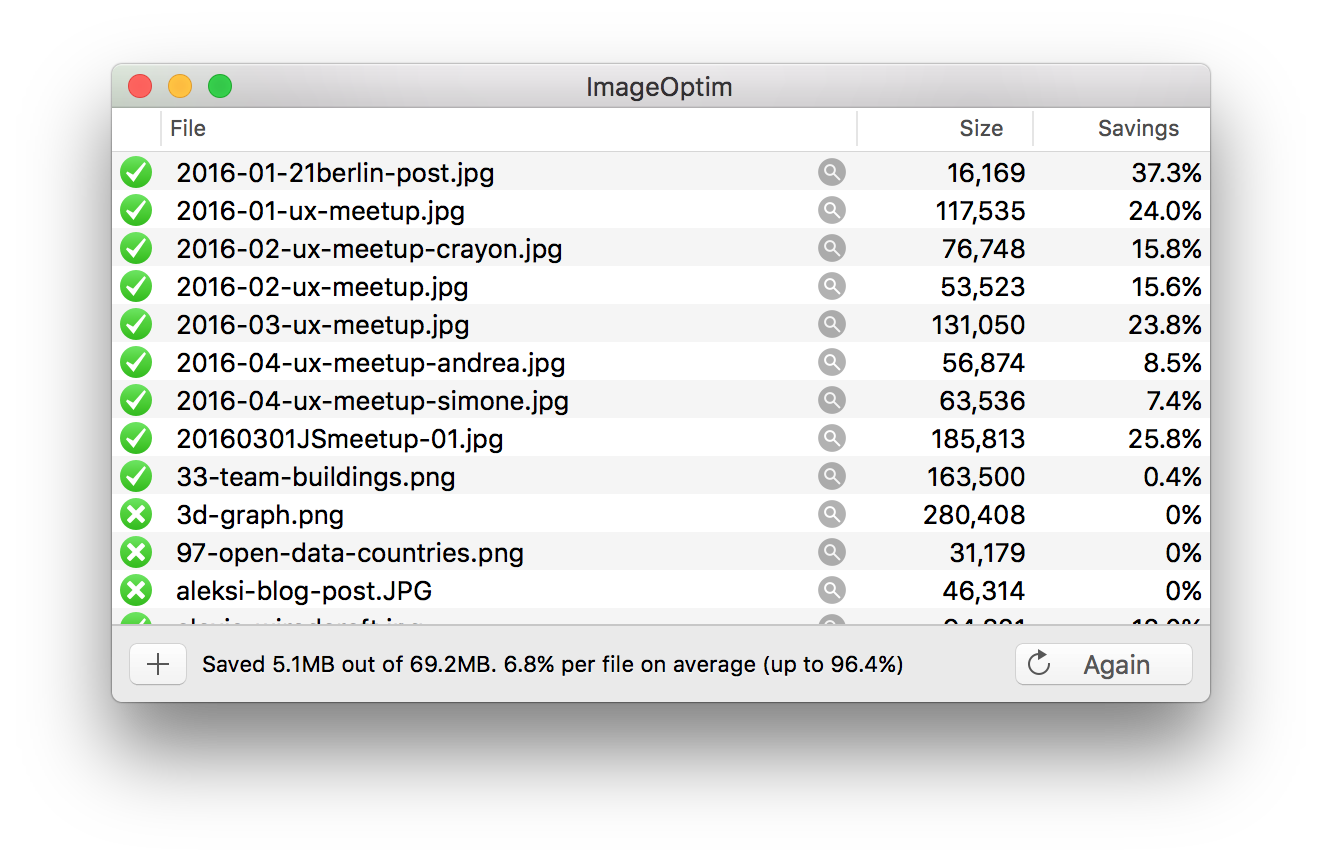
Most of your pictures are probably not optimized for the Web. With the explosion of screen-wide pictures, retina screens, and the like, you may want to spend a couple minutes thinking about this issue.
Personally, I drop my entire Jekyll folder into something like ImageOptim (I’m sure you can find an equivalent for Windows or Linux), and I get lossless compression in a few minutes. You can cut images’ size down by over 50%.
Step 2: Use an asset pipeline
Jekyll does handle SASS out-of-the-box, but falls short as soon as you need concatenation, minification, Javascript dependencies… For that you’ll need something like Grunt and Gulp.
I usually use Gulp. I have only a few npm dependencies in my package.json (see the gist):
"dependencies": {
    "bower": "*",
    "gulp": "*",
    "gulp-concat": "*",
    "gulp-minify-css": "*",
    "gulp-sass": "*",
    "gulp-uglify": "*",
    "node-bourbon": "*"
}
And this is an example of how I use SASS in my gulpfile.js (see the gist):
// Prepares the CSS file
gulp.task('css', function() {
    gulp.src(assets.css)
        .pipe(sass({ includePaths: require('node-bourbon').includePaths }))
        .pipe(concat('styles.css'))
        .pipe(minify({keepBreaks:true}))
        .pipe(gulp.dest('_includes'));
});
I also recommend you use Bower for front-end dependencies (e.g. jQuery).
Step 3: JS at the end & inlined CSS
You probably already know that you should drop your JS files at the end of the <body>.
But if your CSS isn’t gigantic (and hopefully it isn’t), Google recommends that you inline it in the <head> of your page.
As you saw in my previous point, I am writing my concatenated and minified CSS in the _includes/ folder. This allows me to simply include it in the _layouts/default.html template of my website:
<!-- CSS -->
<style>
{% include styles.css %}
</style>
And done!
Step 4: Avoid blocking CSS/JS
A good example for this is @font-face. You’ve probably been faced with the “Flash of Invisible Text” at some point.
You can easily get around it by asynchronously loading the custom font in the page using jQuery for example:
$(function() {
    var fonts = 'https://fonts.googleapis.com/css?family=Montserrat:300,300italic,400,400italic,700,700italic|Lato:300,300italic,400,400italic,700,700italic';
    if (document.createStyleSheet) document.createStyleSheet(fonts);
    else $("head").append($("<link rel='stylesheet' href='"+ fonts +"' type='text/css' media='screen' />"));
});
Overall, just favor asynchronous behaviors.
Step 5: Use a CDN
That’s probably the most important point. Use a goddamn CDN, seriously.
CloudFlare is a free no-brainer. Just do it.

Additionally, you’ll get a couple freebies out of this…
Step 6: Enable compression & browser caching
Out-of-the-box with CloudFlare (use it already). You want to gzip your pages and assets and leverage browser caching.
Step 7: Enable SSL
Google now favors HTTPS websites. Again, you get that for free with CloudFlare: enable SSL and add a PageRule to force the redirection from HTTP to HTTPS.
Step 8: Use something like Algolia

Now, if you need to add search to a static site, Algolia (or something similar) is an obvious pick.
But we also use it to replace two major features Jekyll suck at;
-
Pagination: your good old listing pages (e.g. your blog). While Jekyll offers pagination, it’s confusing to implement and slow to generate. Since these pages usually have literally no SEO value, you can easily replace them with a paginated listing from Algolia.
-
Related posts: Jekyll offers the
related_postsvariable, but it means additional gymnastics on each page to display the related posts and it is notoriously bad at recommending actual relevant content. Using Algolia, you get to load that content asynchronously in the front-end and you get much more relevant posts.
This leads me to my next point.
Step 9: Don’t use Jekyll Plugins
Just don’t. They’re not supported on GitHub pages anyway, and they’re the best way to end up shooting yourself in the foot. More plugins means longer build times (and potentially bugs).
There’s almost always a better or simpler way to do things using vanilla Jekyll combined with a front-end library or a 3rd party (e.g. Algolia) when needed.
I don’t even use Rouge, the syntax highlighter that comes with Jekyll. For the past few years I’ve simply used Highlight.js, a front-end syntax highlighter.
Step 10: Avoid loops & use variables
First, use assign and capture to avoid running the same tests over and over again.
When I do multilingual websites, I make sure to declare my locale as a variable at the top of the _includes/default.html template. I often see people sprinkling the same conditional statements all over their code.
And then, please, run away as fast as possible from loops. Think about that little for loop you run through your list of authors to write the bio once you start having 20 authors and 100 posts.
I recently took over the migration of a blog from Wordpress to Jekyll, with around 80 authors and over 40,000 posts. Instead of running through that entire array of authors in every single one of the posts to display their little blurbs of information (that search engines don’t even care about), I did the following:
-
Generate (once!) the entire dump of author info in a JSON file at
api/authors.json:{ "Bob Smith": { "picture": "https://example.com/users/bob-smith.jpg", "bio": "Bob is a jerk.", "url": "https://linkedin.com/bob-smith/", "twitter": "bob-smith" }, "John Doe": { "picture": "https://example.com/users/bob-smith.jpg", "bio": "John isn't a jerk.", "url": "https://about.com/john-doe/", "twitter": "john-doe" } }Note: I actually stored the author information in a CSV file in
_data(love that feature), to make it easy for the client to maintain the list of authors with Excel. I then generated the JSON file with a simple Liquid template. -
In the article template, simply display the full author name which was readily available.
-
Use a small jQuery script to asynchronously retrieve and display the full author bio:
 $(function() {
   if (typeof authors != 'undefined'  && authors.length) {
     // Get the authors meta data and build the mentions at the bottom of the article
     $.getJSON(url +'/api/authors.json', function(data) {
       $('#content .body .wrapper').append('<footer class="authors"></footer>');

       for (i = 0; i < authors.length; i++) {
         var name = authors[i];
         var meta = data[name];

         // Just in case we don't have any info (shit happens)
         if (meta == undefined) meta = {};

         var mention = '';

         mention += '<section class="author">'+"\n";
         mention += '  <h3>'+"\n";
         if (meta.picture == undefined || meta.picture == '')
         meta.picture = 'https://www.newamerica.org/images/experts/avatar-placeholder.png';
         mention += '  <img src="'+ meta.picture +'" alt="'+ name +'\' s picture"/>'+"\n";
         if (meta.url != undefined && meta.url != '')
         mention += '    <a href="'+ meta.url +'">'+ name +'</a>'+"\n";
         else
         mention += '    '+ name +"\n";
         mention += '  </h3>'+"\n";
         if (meta.bio != undefined && meta.bio != '') {
           mention += '  <p>'+ meta.bio.substring(0, 140) + '...';
           if (meta.url != undefined && meta.url != '')
           mention += ' <a href="'+ meta.url +'" class="more">Read the whole bio →</a>';
           mention += '  </p>'+"\n";
         }
         mention += '</section>'+"\n";

         $('#content .body .authors').append(mention);
       }
     });
   }
 });
I cut the compile time drastically simply by saving myself that one loop.
Step 11: Generate only the latest post
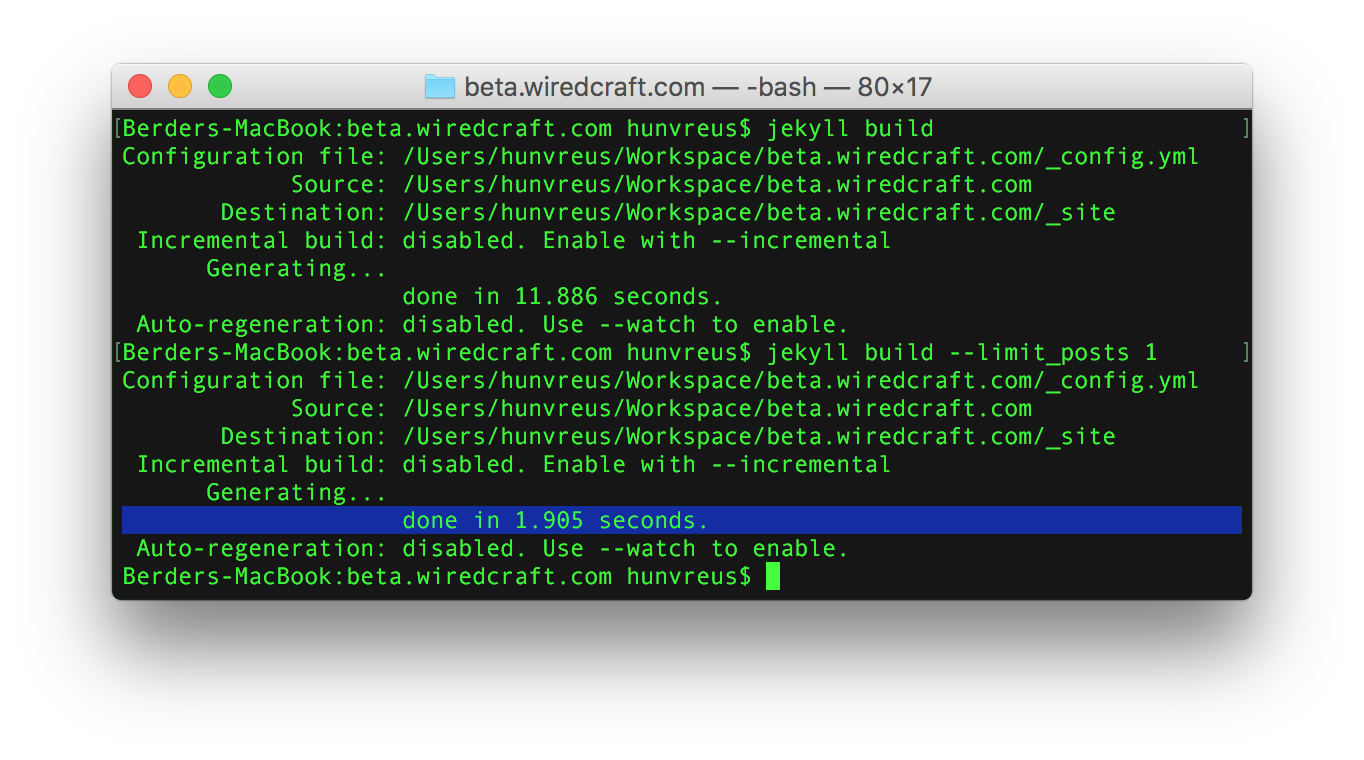
Because once you’re done tweaking your design, what you’re mostly going to do is simply add a new page or article once in a while. Why then would you need to re-generate the entire site?
Use the --limit_posts flag to only re-generate the latest changed file.
Step 12: Ignore stuff

Using either _config.yml or adding underscore to your folders, you can tell Jekyll to ignore folders. People often don’t realize that if they have a couple hundreds of pictures on their website, Jekyll needs to go through every single one of them every time it generates the site.
You can easily ignore all your images for example by moving them to _images/ and handle pushing them to production separately, either by having a separate deploy pipeline or using a separate service altogether to host them.
Step 13: Incremental builds
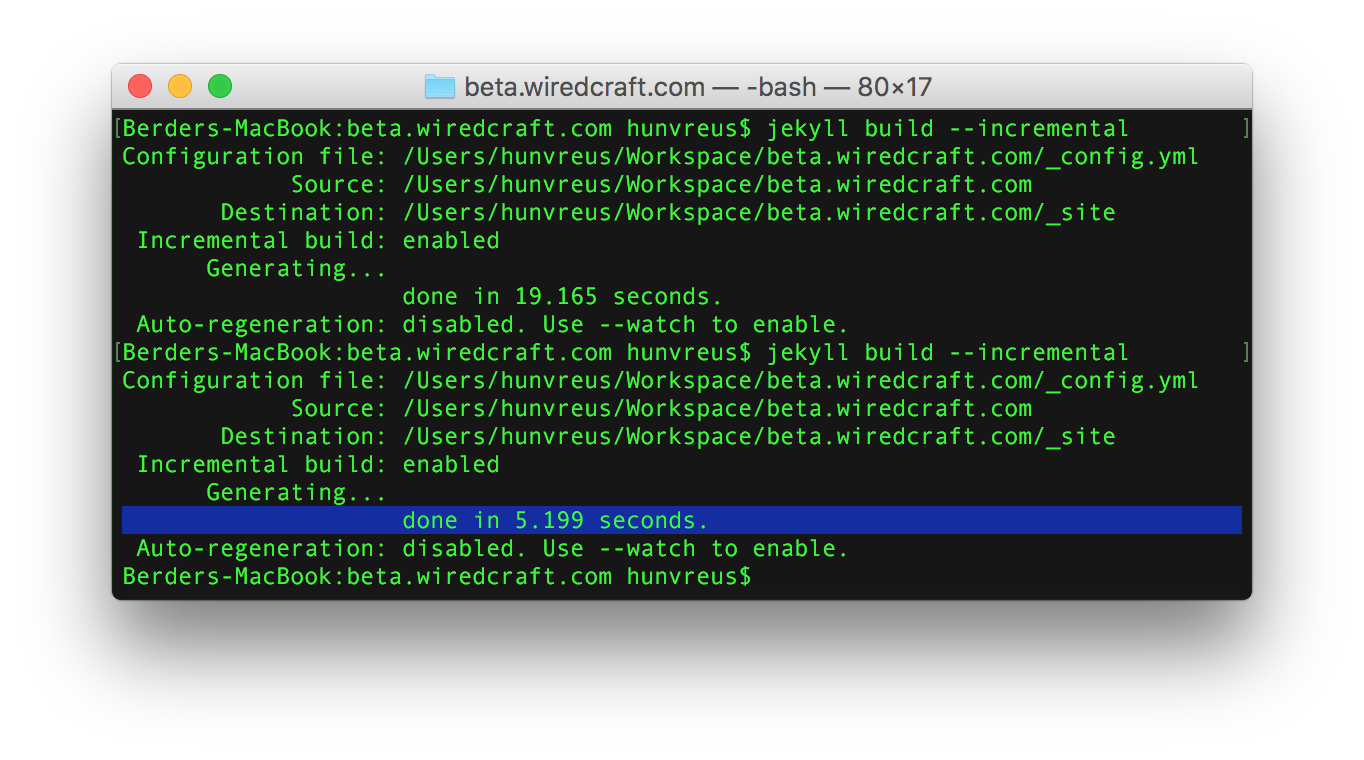
Now if you’re using Jekyll 3 (which, again, is supported on GitHub pages), you’re in for a treat.
This version ships with experimental support for incremental builds; Jekyll keeps an index of changes on files and their respective dependencies, allowing it to figure out the minimum amount of pages to rebuild whenever you change anything.
Are you not entertained?

If you still feel like you’re not getting the performance you want on the generation side, I suggest you leverage the Liquid profiler (with the --profile flag on Jekyll 3) to figure out where the Jekyll builds are spending the most time.
You can also consider these alternatives: for larger sites (over 100,000 pages), I had great results with Hugo, a static generator written in Go with interesting performance. I also like the fact that I don’t need to deal with Ruby’s ridiculously fragile Ruby and Gems dependencies (and so do my DevOps colleagues).
Do you have any tips for Jekyll that I didn’t cover? Let me know on Twitter or send us an email with your own tips and tricks.
Stay tuned
Follow our newsletter or our WeChat account; every other week you'll receive news about what we're up to, our events and our insights on digital products, omnichannel, cross-border ecommerce or whatever the team fancies.
-
Add us on WeChat

-
Subscribe to our newsletter