How to automate your email newsletter with Mailjet and Zapier
A step by step guide to setting up your monthly automated newsletter from blog posts.
A regular newsletter is a good way to keep in touch with your audience, and share the latest company news with them. However, it’s pretty troublesome to update your content every time it’s sent. Automation is a great way to save yourself time.
In this blog post, I will be taking you with me on a journey to automate your newsletter.
Tools to Use
- Mailing Service (eg. MailJet, MailChimp)
- Google Calendar
- Zapier ( Starter Account, the multi-step functionality is a requirement)
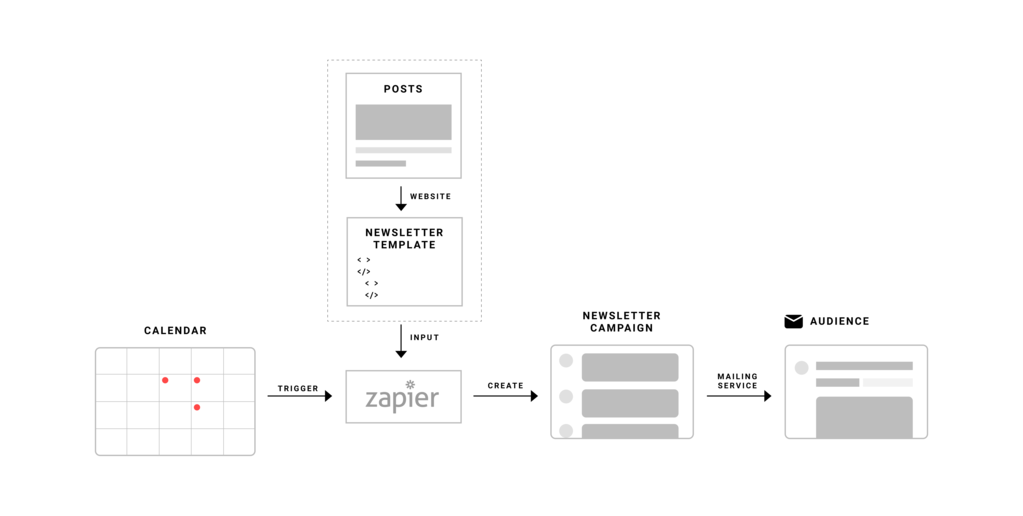
Creating a Newsletter Campaign
The first step is to decide on your content in the form of a newsletter template, and the second is to decide the best time to send the newsletter.
Putting Together your Newsletter Template
The Wiredcraft website keeps track of the blog posts created. RSS serves as the data source, and that’s also how we manage to automate our social media posts. These posts can be gathered in a single webpage of your own design (or you could use a template) that will serve as the content of the newsletter. For example, this is what the Wiredcraft newsletter page looks like: https://wiredcraft.com/newsletter/
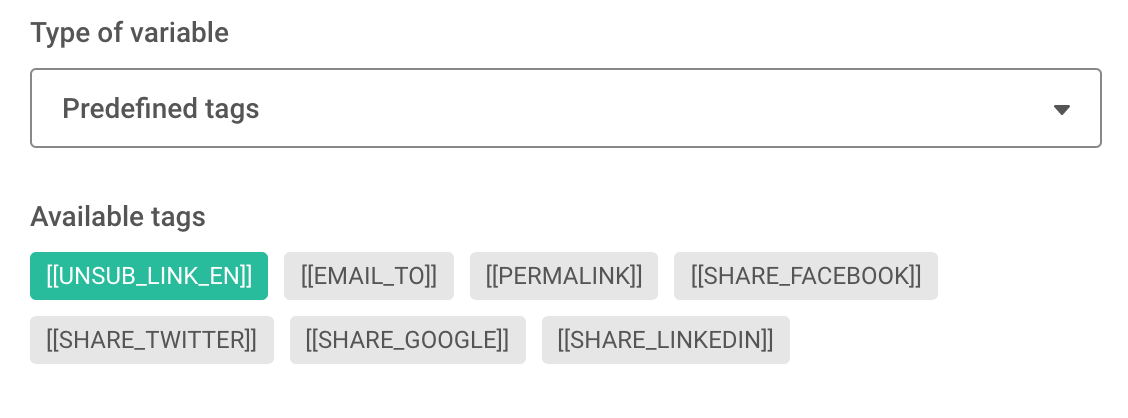
Once you are done with the layout, you should not forget to add an unsubscribe button at the bottom of the page, otherwise, your newsletter may be flagged as spam.
You can include these predefined variables in the HTML as you see fit. Don’t worry if it doesn’t work when you try to test them, as these links will work when sent by Mailjet.
Google Calendar Events to Manage the Schedule
Google Calendar is a powerful tool to not only manage your personal schedule, but for your automation as well. We use it to trigger Zapier and the flexibility of a calendar event makes Google Calendar the best candidate for this trigger.
You can set up the time as you see fit for when to send the newsletter. Also, it is always a good idea to send a test mail a few days before the actual newsletter is sent. You can set it up on a specific day of the week, but if you want to be more specific, such as 4 days before the 1st, then you can set up a repeating event in Google Calendar on last X day of the month.
However, keep in mind that Mailjet limits mails to a maximum of 200 per day for the free plan, so if you have more than 200 subscribers, your newsletter will be sent over a period of time, so plan for that.
Choosing a Mailing Service
Mailjet and MailChimp are some of the popular options and you may consider which one to use.
If you decide to switch from MailChimp to Mailjet like us, don’t forget the upcoming subscribers while transferring the existing subscribers. The solution for the latter, is a simple Zap (an automation flow from Zapier) that checks when a subscriber is subscribed to MailChimp and subscribes them to Mailjet. The intuitive interface of Zapier makes it easy to automate this process.
Making a Zap!
A Zap is a blueprint for a task you want to do over and over. - Zapier
Now that the content is ready, it is time to serve it. Using a Zap is for automating a newsletter is a good idea, but it may be complicated.
Let’s give it a try.
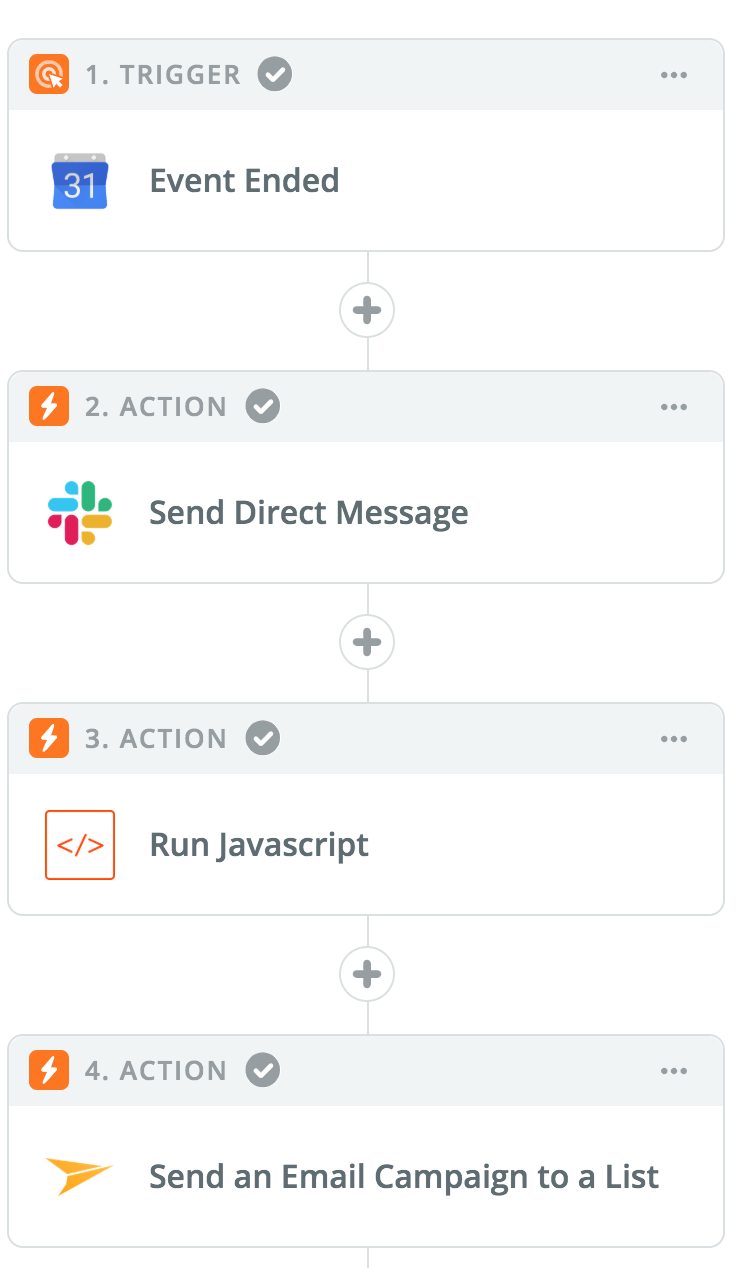
Setting Up a Trigger
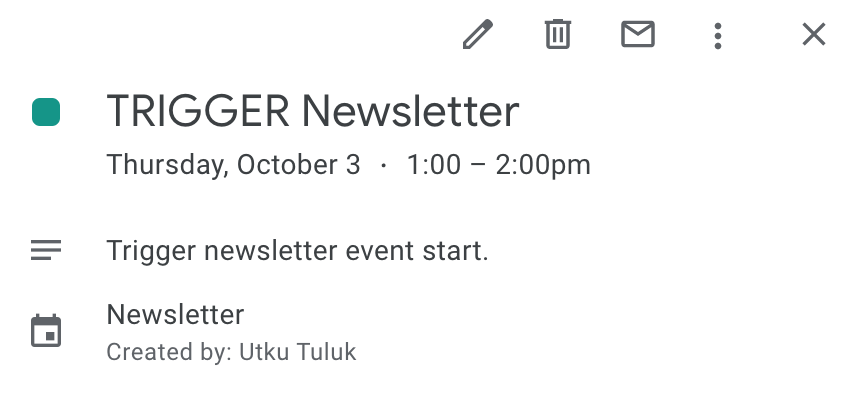
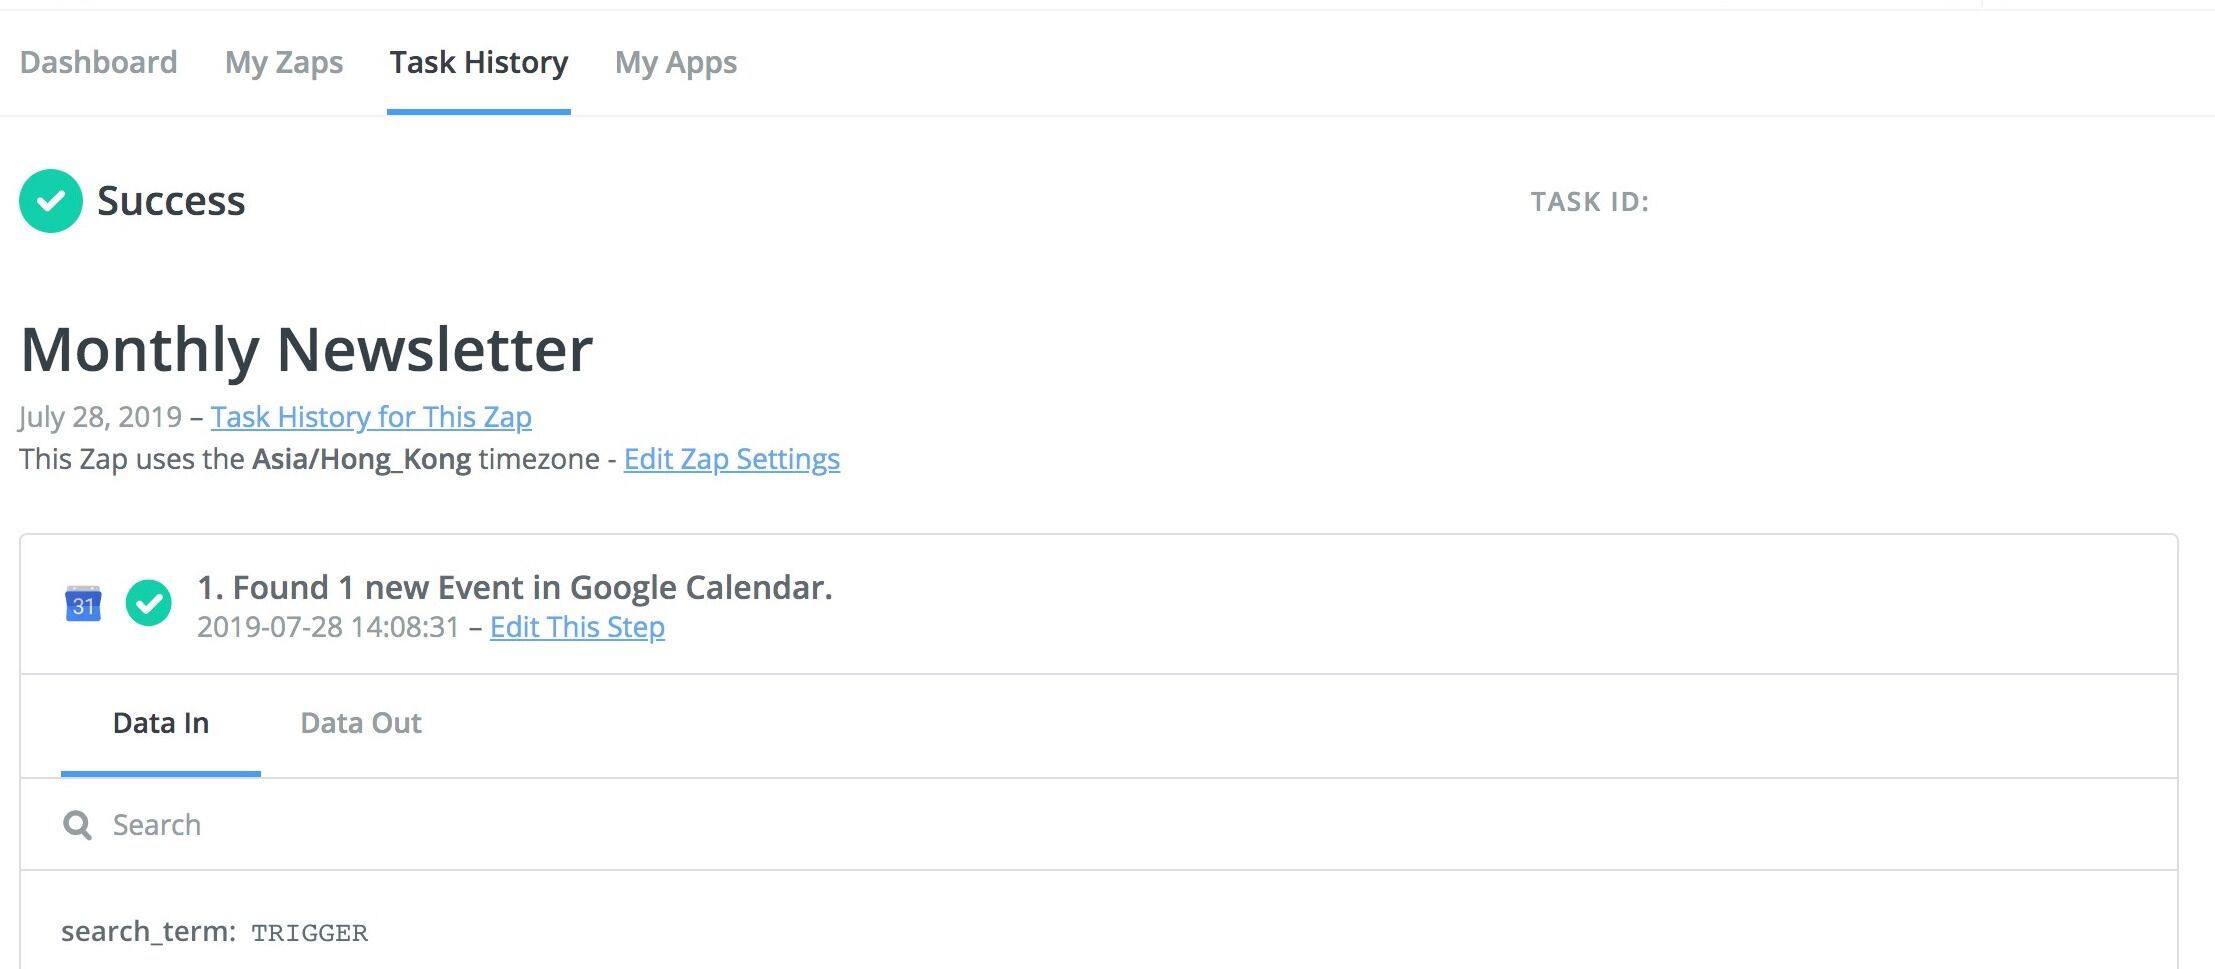
A repeating Google Calendar event should be created for this step. It is a good idea to name it TRIGGER or something similar to avoid conflicts with other events, or even better, to place it in a separate calendar. Next, you can choose Google Calendar as the Trigger App in Zapier and follow the steps. New Event Matching Search is a good option since it will make sure only the TRIGGER events you just created will start the Zap. Don’t worry if the Test step doesn’t seem to work, Zapier cannot access your calendar until you enable it.
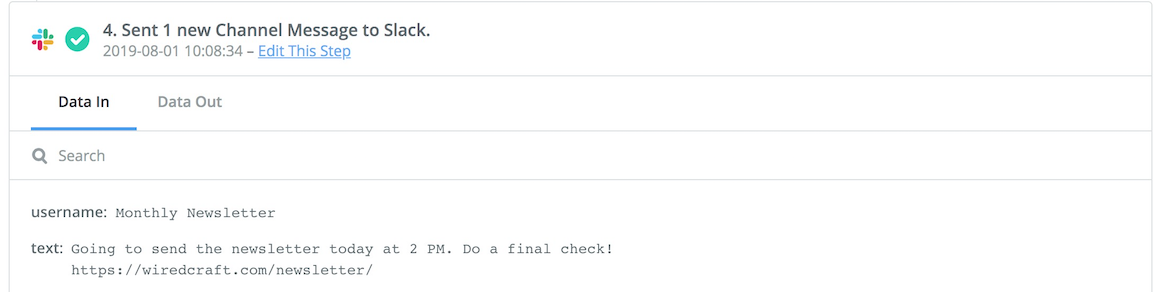
Remind Yourself of the Newsletter
The newsletter is a small task among the many so it may be hard to spot whether there is a mistake. You can set up a reminder thanks to the Slack integration with Zapier. Add a step after the Trigger and choose Slack from the list. Then, simply fill in the information as you want.
How to Get the Template?
The HTML template you created should be sitting on your website now, but how can Zap know that? A simple Javascript code is necessary here. Choose Code as the Action and use the following code inside the Code field.
const res = await fetch(inputData.site);
const body = await res.text();
return {rawHTML: body};
You may have noticed your website link is not placed yet. That is what the Input Data field is for. Place site to the left and the link to your HTML document on the right.
Now you will be able to use your template with Zapier.
Sending a campaign with Mailjet Zap
The last step is the most important step: Sending the newsletter. Use the Mailjet App to Send an Email Campaign and follow the steps. In the Edit Template section, you can click the button to the right to access the newsletter template - it will be under the Run Javascript dropdown named as Raw HTML. You won’t be able to edit your template at this step, so make sure to do it while editing the HTML file if you want to add or remove some parts. Don’t forget to choose another Contact List while doing your testing, no one likes random emails.
Finally, select your actual contact list and skip the test to finish writing the Zap.
Testing your automated campaign
It is important to make sure Zap is working as you want it to work. The Task History tab will tell you the status of the Zap.
A few tips to consider to make testing easier:
- Zap has an action called Delay. This can be used to increase the time between the Slack notification and sending the newsletter. Keep in mind that Zap has to be triggered in order to function so you will have to adjust your calendar event accordingly.
- You can send the newsletter twice with a test audience and the real audience with a delay in between to make sure everything works.
- Slack notifications at each step before sending emails make it easier to keep up with automation and intervene if there are problems.
- You have to re-test your Code action if you change your newsletter template, Zapier will simply use the old one if you don’t.
Done, Time to Relax.
That is it. You can now enable the Zap and it will send the newsletter to your audience when the calendar event is done. Just edit the separate file if you ever need to adjust the order of the posts.
Stay tuned
Follow our newsletter or our WeChat account; every other week you'll receive news about what we're up to, our events and our insights on digital products, omnichannel, cross-border ecommerce or whatever the team fancies.
-
Add us on WeChat

-
Subscribe to our newsletter